by Noguchi Squash Academy

by Noguchi Squash Academy |
|
【Basic Tactics】 【Workshop】 【Column】 【Q & A】 【AUS National Coaching Conference】 |
|
INTRODUCTION |
created by Katsuji Noguchi
|
|
【AUS National Coaching Conference】 07.01.21 new |
1.Tactical Scoring |
1. Tactical Scoring |
|
||
|
|
The purpose of Pressure Shot is to move your opponent out of the “T” and not give him or her time to return to the “T”. Both the straight drive and the crosscourt must be low and fast. Try to hit the straight drive to the back corner on the second bounce (P-1) or try to hit the crosscourt to the back corner on the second bouncein order to hit the side wall first and bounce on the floor, and then land in the back nick (P-2) or try to hit the crosscourt to the side wall first and bounce on the floor, and then land in the back nick(P-3). The drop shot should be aimed for the nick, and the boast should be land in the nick on the second bounce . Every shot is intended to force your opponent to run to the farthest points away from the “T”.
|
||
|
||
|
||
2. Tactical Offense
|
|
|
Next is about the positioning of hitting Pressure Shot. The two or more types of Pressure Shot that your opponent has to expect certainly include a shot to the back corner, such as the straight drive or the crosscourt. As mentioned in the previous section, the straight drive and the crosscourt of Pressure Shot must be low and fast, and then hit the back corner on the second bounce. Alternatively, the crosscourt should hit the side wall first and go to the back nick on the second bounce. To do so, you need to get closer to some extent to the front wall. That is because the closer you get to the front wall, the faster your shot will be. Even the shot is the same course and speed, if you contrive a way of stroking it, the shot could be seen as a totally different shot by your opponent. |
 |
3. Tactical Defense |
|
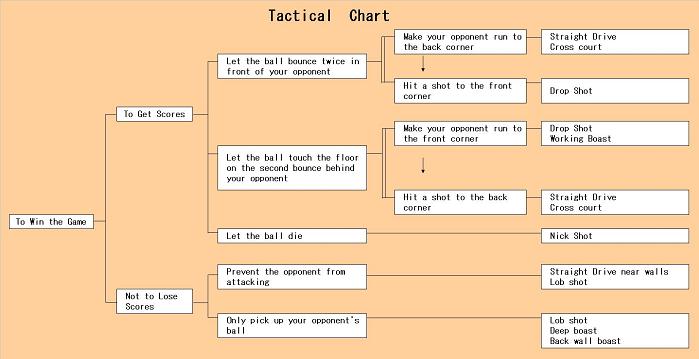
4.
Tactical Chart |
|
|
|
|
created by Katsuji Noguchi
K. Noguchi © Copyright 2005, All rights reserved 野口かつじ スカッシュ